Contact Us (800) 497-8360 | customerservice@ourtownamerica.com
Severity: 8192
Message: Creation of dynamic property Help::$benchmark is deprecated
Filename: core/Controller.php
Line Number: 75
Backtrace:
File: /var/www/html/rockwell/includes/codeigniter/applications/sponsor_web/controllers/Help.php
Line: 7
Function: __construct
File: /var/www/html/rockwell/htdocs/sponsor/index.php
Line: 315
Function: require_once
Severity: 8192
Message: Creation of dynamic property Help::$hooks is deprecated
Filename: core/Controller.php
Line Number: 75
Backtrace:
File: /var/www/html/rockwell/includes/codeigniter/applications/sponsor_web/controllers/Help.php
Line: 7
Function: __construct
File: /var/www/html/rockwell/htdocs/sponsor/index.php
Line: 315
Function: require_once
Severity: 8192
Message: Creation of dynamic property Help::$config is deprecated
Filename: core/Controller.php
Line Number: 75
Backtrace:
File: /var/www/html/rockwell/includes/codeigniter/applications/sponsor_web/controllers/Help.php
Line: 7
Function: __construct
File: /var/www/html/rockwell/htdocs/sponsor/index.php
Line: 315
Function: require_once
Severity: 8192
Message: Creation of dynamic property Help::$log is deprecated
Filename: core/Controller.php
Line Number: 75
Backtrace:
File: /var/www/html/rockwell/includes/codeigniter/applications/sponsor_web/controllers/Help.php
Line: 7
Function: __construct
File: /var/www/html/rockwell/htdocs/sponsor/index.php
Line: 315
Function: require_once
Severity: 8192
Message: Creation of dynamic property Help::$utf8 is deprecated
Filename: core/Controller.php
Line Number: 75
Backtrace:
File: /var/www/html/rockwell/includes/codeigniter/applications/sponsor_web/controllers/Help.php
Line: 7
Function: __construct
File: /var/www/html/rockwell/htdocs/sponsor/index.php
Line: 315
Function: require_once
Severity: 8192
Message: Creation of dynamic property Help::$uri is deprecated
Filename: core/Controller.php
Line Number: 75
Backtrace:
File: /var/www/html/rockwell/includes/codeigniter/applications/sponsor_web/controllers/Help.php
Line: 7
Function: __construct
File: /var/www/html/rockwell/htdocs/sponsor/index.php
Line: 315
Function: require_once
Severity: 8192
Message: Creation of dynamic property Help::$router is deprecated
Filename: core/Controller.php
Line Number: 75
Backtrace:
File: /var/www/html/rockwell/includes/codeigniter/applications/sponsor_web/controllers/Help.php
Line: 7
Function: __construct
File: /var/www/html/rockwell/htdocs/sponsor/index.php
Line: 315
Function: require_once
Severity: 8192
Message: Creation of dynamic property Help::$output is deprecated
Filename: core/Controller.php
Line Number: 75
Backtrace:
File: /var/www/html/rockwell/includes/codeigniter/applications/sponsor_web/controllers/Help.php
Line: 7
Function: __construct
File: /var/www/html/rockwell/htdocs/sponsor/index.php
Line: 315
Function: require_once
Severity: 8192
Message: Creation of dynamic property Help::$security is deprecated
Filename: core/Controller.php
Line Number: 75
Backtrace:
File: /var/www/html/rockwell/includes/codeigniter/applications/sponsor_web/controllers/Help.php
Line: 7
Function: __construct
File: /var/www/html/rockwell/htdocs/sponsor/index.php
Line: 315
Function: require_once
Severity: 8192
Message: Creation of dynamic property Help::$input is deprecated
Filename: core/Controller.php
Line Number: 75
Backtrace:
File: /var/www/html/rockwell/includes/codeigniter/applications/sponsor_web/controllers/Help.php
Line: 7
Function: __construct
File: /var/www/html/rockwell/htdocs/sponsor/index.php
Line: 315
Function: require_once
Severity: 8192
Message: Creation of dynamic property Help::$lang is deprecated
Filename: core/Controller.php
Line Number: 75
Backtrace:
File: /var/www/html/rockwell/includes/codeigniter/applications/sponsor_web/controllers/Help.php
Line: 7
Function: __construct
File: /var/www/html/rockwell/htdocs/sponsor/index.php
Line: 315
Function: require_once
Severity: 8192
Message: Creation of dynamic property Help::$load is deprecated
Filename: core/Controller.php
Line Number: 78
Backtrace:
File: /var/www/html/rockwell/includes/codeigniter/applications/sponsor_web/controllers/Help.php
Line: 7
Function: __construct
File: /var/www/html/rockwell/htdocs/sponsor/index.php
Line: 315
Function: require_once
Severity: 8192
Message: Creation of dynamic property Help::$db is deprecated
Filename: core/Loader.php
Line Number: 396
Backtrace:
File: /var/www/html/rockwell/includes/codeigniter/applications/sponsor_web/controllers/Help.php
Line: 7
Function: __construct
File: /var/www/html/rockwell/htdocs/sponsor/index.php
Line: 315
Function: require_once
Severity: 8192
Message: Creation of dynamic property CI_DB_oci8_driver::$usequote is deprecated
Filename: database/DB_driver.php
Line Number: 372
Backtrace:
File: /var/www/html/rockwell/includes/codeigniter/applications/sponsor_web/controllers/Help.php
Line: 7
Function: __construct
File: /var/www/html/rockwell/htdocs/sponsor/index.php
Line: 315
Function: require_once
Severity: 8192
Message: str_replace(): Passing null to parameter #3 ($subject) of type array|string is deprecated
Filename: oci8/oci8_driver.php
Line Number: 160
Backtrace:
File: /var/www/html/rockwell/includes/codeigniter/applications/sponsor_web/controllers/Help.php
Line: 7
Function: __construct
File: /var/www/html/rockwell/htdocs/sponsor/index.php
Line: 315
Function: require_once
Severity: 8192
Message: Return type of CI_Session_files_driver::open($save_path, $name) should either be compatible with SessionHandlerInterface::open(string $path, string $name): bool, or the #[\ReturnTypeWillChange] attribute should be used to temporarily suppress the notice
Filename: drivers/Session_files_driver.php
Line Number: 132
Backtrace:
File: /var/www/html/rockwell/includes/codeigniter/applications/sponsor_web/controllers/Help.php
Line: 7
Function: __construct
File: /var/www/html/rockwell/htdocs/sponsor/index.php
Line: 315
Function: require_once
Severity: 8192
Message: Return type of CI_Session_files_driver::close() should either be compatible with SessionHandlerInterface::close(): bool, or the #[\ReturnTypeWillChange] attribute should be used to temporarily suppress the notice
Filename: drivers/Session_files_driver.php
Line Number: 292
Backtrace:
File: /var/www/html/rockwell/includes/codeigniter/applications/sponsor_web/controllers/Help.php
Line: 7
Function: __construct
File: /var/www/html/rockwell/htdocs/sponsor/index.php
Line: 315
Function: require_once
Severity: 8192
Message: Return type of CI_Session_files_driver::read($session_id) should either be compatible with SessionHandlerInterface::read(string $id): string|false, or the #[\ReturnTypeWillChange] attribute should be used to temporarily suppress the notice
Filename: drivers/Session_files_driver.php
Line Number: 166
Backtrace:
File: /var/www/html/rockwell/includes/codeigniter/applications/sponsor_web/controllers/Help.php
Line: 7
Function: __construct
File: /var/www/html/rockwell/htdocs/sponsor/index.php
Line: 315
Function: require_once
Severity: 8192
Message: Return type of CI_Session_files_driver::write($session_id, $session_data) should either be compatible with SessionHandlerInterface::write(string $id, string $data): bool, or the #[\ReturnTypeWillChange] attribute should be used to temporarily suppress the notice
Filename: drivers/Session_files_driver.php
Line Number: 235
Backtrace:
File: /var/www/html/rockwell/includes/codeigniter/applications/sponsor_web/controllers/Help.php
Line: 7
Function: __construct
File: /var/www/html/rockwell/htdocs/sponsor/index.php
Line: 315
Function: require_once
Severity: 8192
Message: Return type of CI_Session_files_driver::destroy($session_id) should either be compatible with SessionHandlerInterface::destroy(string $id): bool, or the #[\ReturnTypeWillChange] attribute should be used to temporarily suppress the notice
Filename: drivers/Session_files_driver.php
Line Number: 315
Backtrace:
File: /var/www/html/rockwell/includes/codeigniter/applications/sponsor_web/controllers/Help.php
Line: 7
Function: __construct
File: /var/www/html/rockwell/htdocs/sponsor/index.php
Line: 315
Function: require_once
Severity: 8192
Message: Return type of CI_Session_files_driver::gc($maxlifetime) should either be compatible with SessionHandlerInterface::gc(int $max_lifetime): int|false, or the #[\ReturnTypeWillChange] attribute should be used to temporarily suppress the notice
Filename: drivers/Session_files_driver.php
Line Number: 356
Backtrace:
File: /var/www/html/rockwell/includes/codeigniter/applications/sponsor_web/controllers/Help.php
Line: 7
Function: __construct
File: /var/www/html/rockwell/htdocs/sponsor/index.php
Line: 315
Function: require_once
Severity: Warning
Message: ini_set(): Session ini settings cannot be changed after headers have already been sent
Filename: Session/Session.php
Line Number: 282
Backtrace:
File: /var/www/html/rockwell/includes/codeigniter/applications/sponsor_web/controllers/Help.php
Line: 7
Function: __construct
File: /var/www/html/rockwell/htdocs/sponsor/index.php
Line: 315
Function: require_once
Severity: Warning
Message: session_set_cookie_params(): Session cookie parameters cannot be changed after headers have already been sent
Filename: Session/Session.php
Line Number: 289
Backtrace:
File: /var/www/html/rockwell/includes/codeigniter/applications/sponsor_web/controllers/Help.php
Line: 7
Function: __construct
File: /var/www/html/rockwell/htdocs/sponsor/index.php
Line: 315
Function: require_once
Severity: Warning
Message: ini_set(): Session ini settings cannot be changed after headers have already been sent
Filename: Session/Session.php
Line Number: 314
Backtrace:
File: /var/www/html/rockwell/includes/codeigniter/applications/sponsor_web/controllers/Help.php
Line: 7
Function: __construct
File: /var/www/html/rockwell/htdocs/sponsor/index.php
Line: 315
Function: require_once
Severity: Warning
Message: ini_set(): Session ini settings cannot be changed after headers have already been sent
Filename: Session/Session.php
Line Number: 315
Backtrace:
File: /var/www/html/rockwell/includes/codeigniter/applications/sponsor_web/controllers/Help.php
Line: 7
Function: __construct
File: /var/www/html/rockwell/htdocs/sponsor/index.php
Line: 315
Function: require_once
Severity: Warning
Message: ini_set(): Session ini settings cannot be changed after headers have already been sent
Filename: Session/Session.php
Line Number: 316
Backtrace:
File: /var/www/html/rockwell/includes/codeigniter/applications/sponsor_web/controllers/Help.php
Line: 7
Function: __construct
File: /var/www/html/rockwell/htdocs/sponsor/index.php
Line: 315
Function: require_once
Severity: Warning
Message: ini_set(): Session ini settings cannot be changed after headers have already been sent
Filename: Session/Session.php
Line Number: 317
Backtrace:
File: /var/www/html/rockwell/includes/codeigniter/applications/sponsor_web/controllers/Help.php
Line: 7
Function: __construct
File: /var/www/html/rockwell/htdocs/sponsor/index.php
Line: 315
Function: require_once
Severity: Warning
Message: ini_set(): Session ini settings cannot be changed after headers have already been sent
Filename: Session/Session.php
Line Number: 375
Backtrace:
File: /var/www/html/rockwell/includes/codeigniter/applications/sponsor_web/controllers/Help.php
Line: 7
Function: __construct
File: /var/www/html/rockwell/htdocs/sponsor/index.php
Line: 315
Function: require_once
Severity: Warning
Message: ini_set(): Session ini settings cannot be changed after headers have already been sent
Filename: drivers/Session_files_driver.php
Line Number: 108
Backtrace:
File: /var/www/html/rockwell/includes/codeigniter/applications/sponsor_web/controllers/Help.php
Line: 7
Function: __construct
File: /var/www/html/rockwell/htdocs/sponsor/index.php
Line: 315
Function: require_once
Severity: Warning
Message: session_set_save_handler(): Session save handler cannot be changed after headers have already been sent
Filename: Session/Session.php
Line Number: 110
Backtrace:
File: /var/www/html/rockwell/includes/codeigniter/applications/sponsor_web/controllers/Help.php
Line: 7
Function: __construct
File: /var/www/html/rockwell/htdocs/sponsor/index.php
Line: 315
Function: require_once
Severity: Warning
Message: session_start(): Session cannot be started after headers have already been sent
Filename: Session/Session.php
Line Number: 143
Backtrace:
File: /var/www/html/rockwell/includes/codeigniter/applications/sponsor_web/controllers/Help.php
Line: 7
Function: __construct
File: /var/www/html/rockwell/htdocs/sponsor/index.php
Line: 315
Function: require_once
Severity: 8192
Message: Creation of dynamic property Help::$session is deprecated
Filename: core/Loader.php
Line Number: 1283
Backtrace:
File: /var/www/html/rockwell/includes/codeigniter/applications/sponsor_web/controllers/Help.php
Line: 7
Function: __construct
File: /var/www/html/rockwell/htdocs/sponsor/index.php
Line: 315
Function: require_once
Severity: 8192
Message: Creation of dynamic property Help::$pagination is deprecated
Filename: core/Loader.php
Line Number: 1283
Backtrace:
File: /var/www/html/rockwell/includes/codeigniter/applications/sponsor_web/controllers/Help.php
Line: 7
Function: __construct
File: /var/www/html/rockwell/htdocs/sponsor/index.php
Line: 315
Function: require_once
Severity: 8192
Message: Creation of dynamic property Help::$sponsor_model is deprecated
Filename: core/Loader.php
Line Number: 358
Backtrace:
File: /var/www/html/rockwell/includes/codeigniter/applications/sponsor_web/controllers/Help.php
Line: 16
Function: model
File: /var/www/html/rockwell/htdocs/sponsor/index.php
Line: 315
Function: require_once
Severity: 8192
Message: Creation of dynamic property CI_Loader::$benchmark is deprecated
Filename: core/Loader.php
Line Number: 931
Backtrace:
File: /var/www/html/rockwell/includes/codeigniter/applications/sponsor_web/controllers/Help.php
Line: 20
Function: view
File: /var/www/html/rockwell/htdocs/sponsor/index.php
Line: 315
Function: require_once
Severity: 8192
Message: Creation of dynamic property CI_Loader::$hooks is deprecated
Filename: core/Loader.php
Line Number: 931
Backtrace:
File: /var/www/html/rockwell/includes/codeigniter/applications/sponsor_web/controllers/Help.php
Line: 20
Function: view
File: /var/www/html/rockwell/htdocs/sponsor/index.php
Line: 315
Function: require_once
Severity: 8192
Message: Creation of dynamic property CI_Loader::$config is deprecated
Filename: core/Loader.php
Line Number: 931
Backtrace:
File: /var/www/html/rockwell/includes/codeigniter/applications/sponsor_web/controllers/Help.php
Line: 20
Function: view
File: /var/www/html/rockwell/htdocs/sponsor/index.php
Line: 315
Function: require_once
Severity: 8192
Message: Creation of dynamic property CI_Loader::$log is deprecated
Filename: core/Loader.php
Line Number: 931
Backtrace:
File: /var/www/html/rockwell/includes/codeigniter/applications/sponsor_web/controllers/Help.php
Line: 20
Function: view
File: /var/www/html/rockwell/htdocs/sponsor/index.php
Line: 315
Function: require_once
Severity: 8192
Message: Creation of dynamic property CI_Loader::$utf8 is deprecated
Filename: core/Loader.php
Line Number: 931
Backtrace:
File: /var/www/html/rockwell/includes/codeigniter/applications/sponsor_web/controllers/Help.php
Line: 20
Function: view
File: /var/www/html/rockwell/htdocs/sponsor/index.php
Line: 315
Function: require_once
Severity: 8192
Message: Creation of dynamic property CI_Loader::$uri is deprecated
Filename: core/Loader.php
Line Number: 931
Backtrace:
File: /var/www/html/rockwell/includes/codeigniter/applications/sponsor_web/controllers/Help.php
Line: 20
Function: view
File: /var/www/html/rockwell/htdocs/sponsor/index.php
Line: 315
Function: require_once
Severity: 8192
Message: Creation of dynamic property CI_Loader::$router is deprecated
Filename: core/Loader.php
Line Number: 931
Backtrace:
File: /var/www/html/rockwell/includes/codeigniter/applications/sponsor_web/controllers/Help.php
Line: 20
Function: view
File: /var/www/html/rockwell/htdocs/sponsor/index.php
Line: 315
Function: require_once
Severity: 8192
Message: Creation of dynamic property CI_Loader::$output is deprecated
Filename: core/Loader.php
Line Number: 931
Backtrace:
File: /var/www/html/rockwell/includes/codeigniter/applications/sponsor_web/controllers/Help.php
Line: 20
Function: view
File: /var/www/html/rockwell/htdocs/sponsor/index.php
Line: 315
Function: require_once
Severity: 8192
Message: Creation of dynamic property CI_Loader::$security is deprecated
Filename: core/Loader.php
Line Number: 931
Backtrace:
File: /var/www/html/rockwell/includes/codeigniter/applications/sponsor_web/controllers/Help.php
Line: 20
Function: view
File: /var/www/html/rockwell/htdocs/sponsor/index.php
Line: 315
Function: require_once
Severity: 8192
Message: Creation of dynamic property CI_Loader::$input is deprecated
Filename: core/Loader.php
Line Number: 931
Backtrace:
File: /var/www/html/rockwell/includes/codeigniter/applications/sponsor_web/controllers/Help.php
Line: 20
Function: view
File: /var/www/html/rockwell/htdocs/sponsor/index.php
Line: 315
Function: require_once
Severity: 8192
Message: Creation of dynamic property CI_Loader::$lang is deprecated
Filename: core/Loader.php
Line Number: 931
Backtrace:
File: /var/www/html/rockwell/includes/codeigniter/applications/sponsor_web/controllers/Help.php
Line: 20
Function: view
File: /var/www/html/rockwell/htdocs/sponsor/index.php
Line: 315
Function: require_once
Severity: 8192
Message: Creation of dynamic property CI_Loader::$load is deprecated
Filename: core/Loader.php
Line Number: 931
Backtrace:
File: /var/www/html/rockwell/includes/codeigniter/applications/sponsor_web/controllers/Help.php
Line: 20
Function: view
File: /var/www/html/rockwell/htdocs/sponsor/index.php
Line: 315
Function: require_once
Severity: 8192
Message: Creation of dynamic property CI_Loader::$db is deprecated
Filename: core/Loader.php
Line Number: 931
Backtrace:
File: /var/www/html/rockwell/includes/codeigniter/applications/sponsor_web/controllers/Help.php
Line: 20
Function: view
File: /var/www/html/rockwell/htdocs/sponsor/index.php
Line: 315
Function: require_once
Severity: 8192
Message: Creation of dynamic property CI_Loader::$session is deprecated
Filename: core/Loader.php
Line Number: 931
Backtrace:
File: /var/www/html/rockwell/includes/codeigniter/applications/sponsor_web/controllers/Help.php
Line: 20
Function: view
File: /var/www/html/rockwell/htdocs/sponsor/index.php
Line: 315
Function: require_once
Severity: 8192
Message: Creation of dynamic property CI_Loader::$pagination is deprecated
Filename: core/Loader.php
Line Number: 931
Backtrace:
File: /var/www/html/rockwell/includes/codeigniter/applications/sponsor_web/controllers/Help.php
Line: 20
Function: view
File: /var/www/html/rockwell/htdocs/sponsor/index.php
Line: 315
Function: require_once
Severity: 8192
Message: Creation of dynamic property CI_Loader::$sponsor_model is deprecated
Filename: core/Loader.php
Line Number: 931
Backtrace:
File: /var/www/html/rockwell/includes/codeigniter/applications/sponsor_web/controllers/Help.php
Line: 20
Function: view
File: /var/www/html/rockwell/htdocs/sponsor/index.php
Line: 315
Function: require_once
Severity: 8192
Message: htmlentities(): Passing null to parameter #1 ($string) of type string is deprecated
Filename: helpers/default_helper.php
Line Number: 5
Backtrace:
File: /var/www/html/rockwell/includes/codeigniter/applications/sponsor_web/helpers/default_helper.php
Line: 5
Function: htmlentities
File: /var/www/html/rockwell/includes/codeigniter/applications/sponsor_web/views/layouts/new.php
Line: 129
Function: h
File: /var/www/html/rockwell/includes/codeigniter/applications/sponsor_web/controllers/Help.php
Line: 20
Function: view
File: /var/www/html/rockwell/htdocs/sponsor/index.php
Line: 315
Function: require_once
The overview page is a snapshot of sponsor information, include account ID, status, certificate links and number of new mover surveys submitted.
The mailings page is a monthly breakdown of certificate mailings in each owned zip code and/or carrier route territory with the corresponding number of new mover households that received certificates.
The timeline page is essentially an activity feed of all events that pertain to a business sponsor's account. This page includes timestamps and details of each event and is broken down into year and month.
The surveys page provides a summary of details pertaining to new mover surveys completed by movers that received a certificate from a business sponsor in their corresponding owned territory. It also provides a list of each and every survey that was received, including the movers' details and their answers to the survey.
The certificate codes page is a management area for those business sponsors that choose to upload single redemption certificate codes. Codes are uploaded here, viewed here, along with redemption data and new mover data. Business sponsors that upload codes include a link to the Our Town America Code Generator Page in the artwork of their certificate so that the new movers that receive these certificates, can visit this page and generate available codes. Once a certificate code is redeemed, it can no longer be accessed via the generator, nor can the same mover redeem another. For additional questions and concerns about certificate codes, please contact your local sponsor services representative.
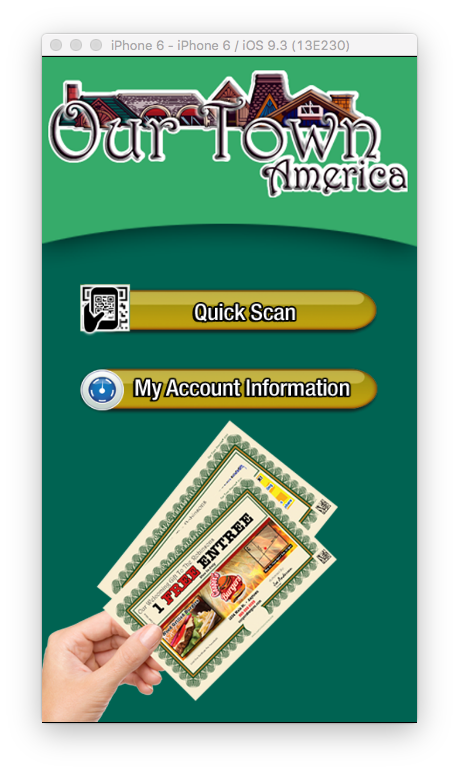
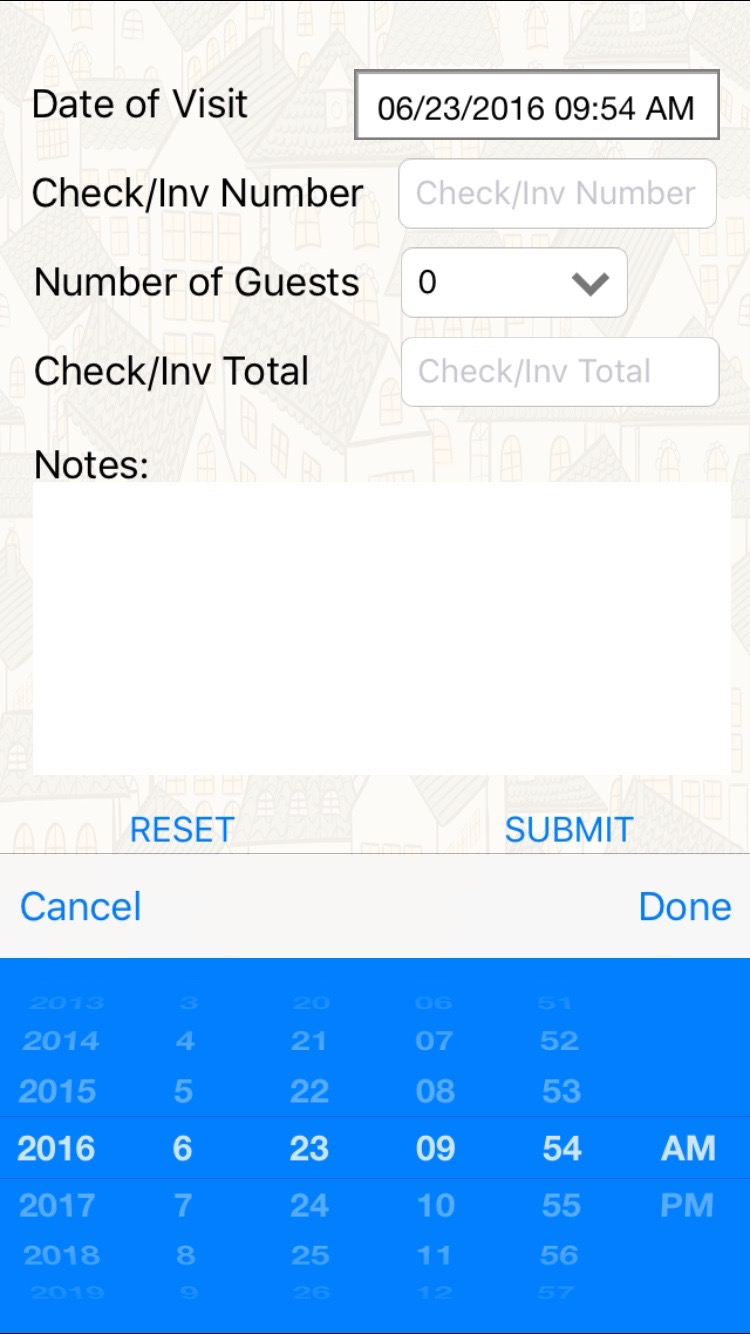
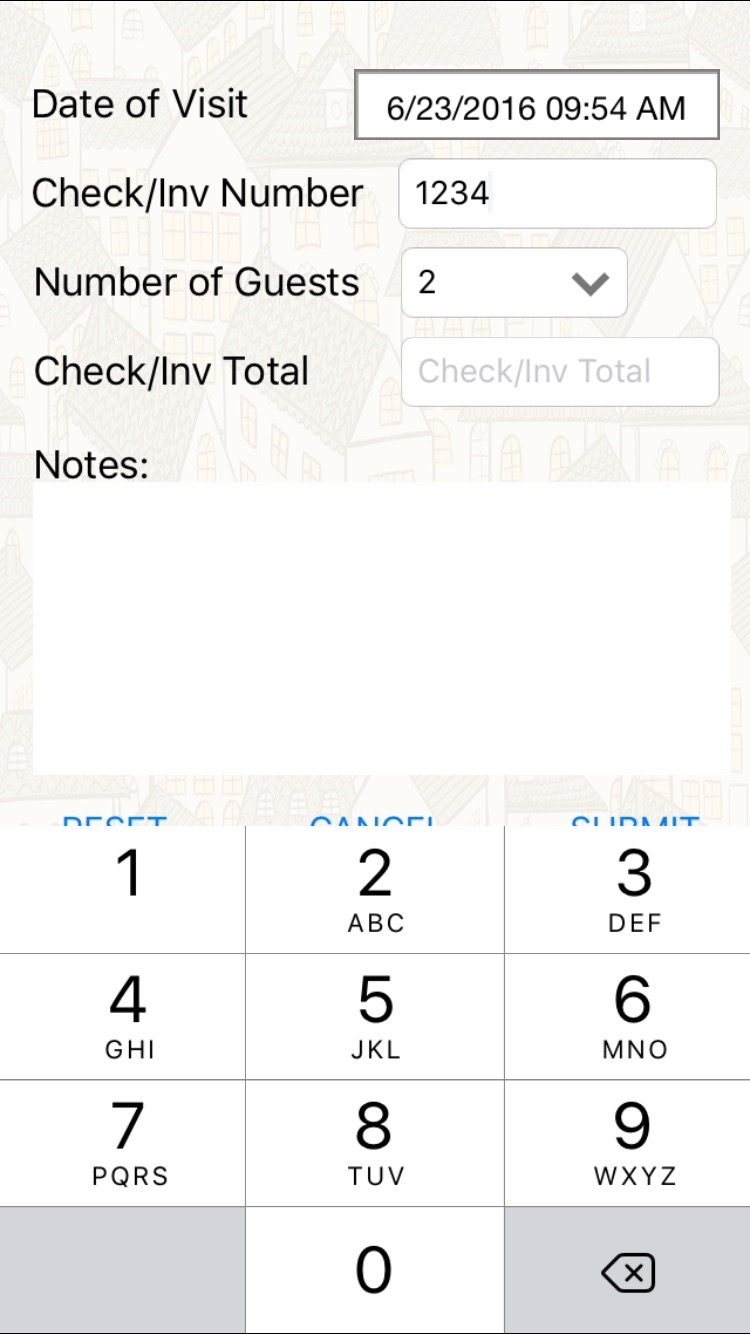
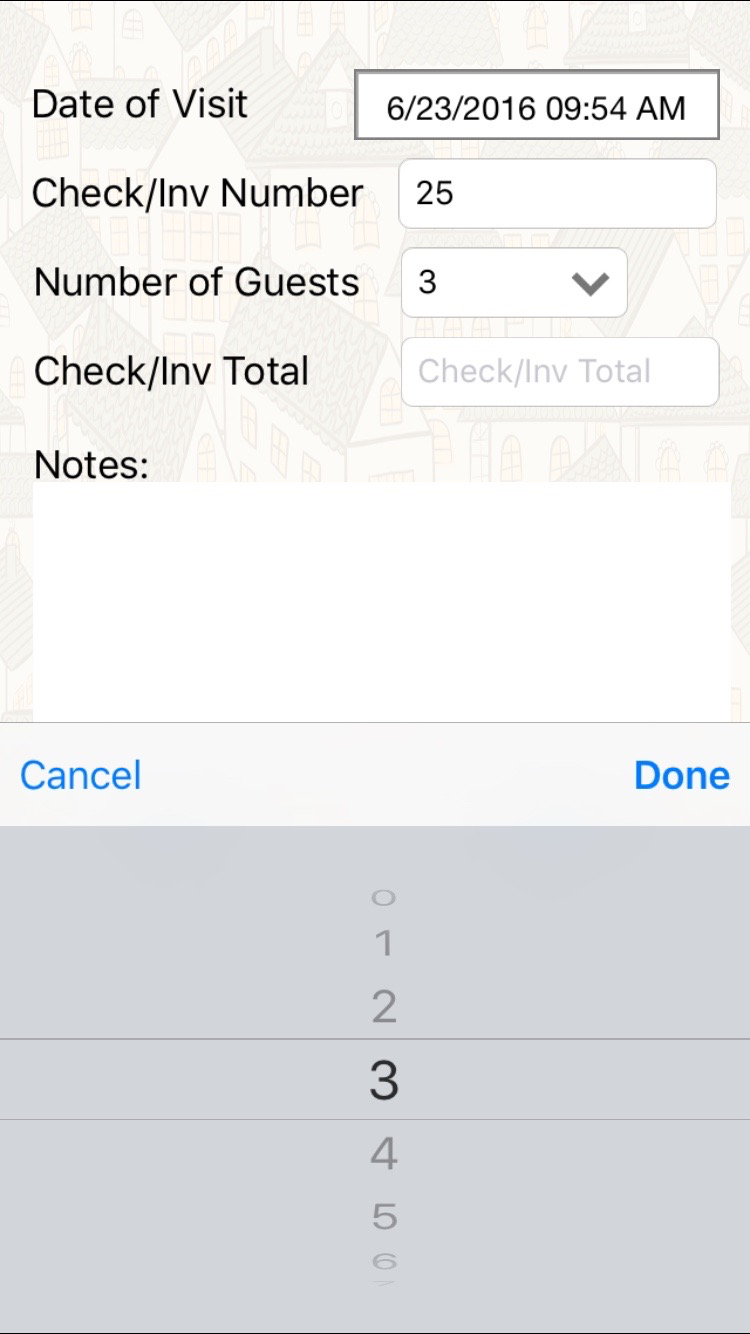
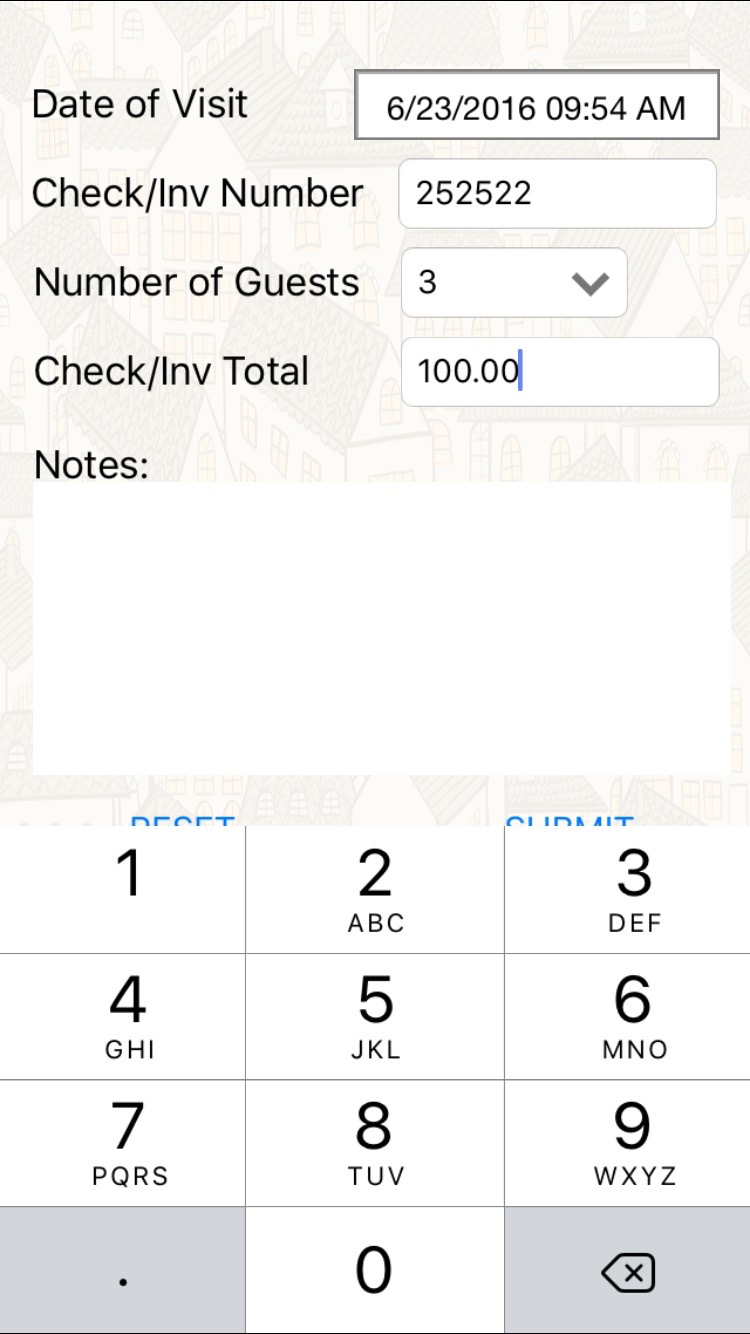
Our Town America TruTrak scanning system has been improved!
Logging in is no longer necessary to scan certificates from your mobile phone.
The scans are authenticated by our server and will only be accepted once.
To start scanning simply click on the TruTrak "Quick Scan" button as shown below.
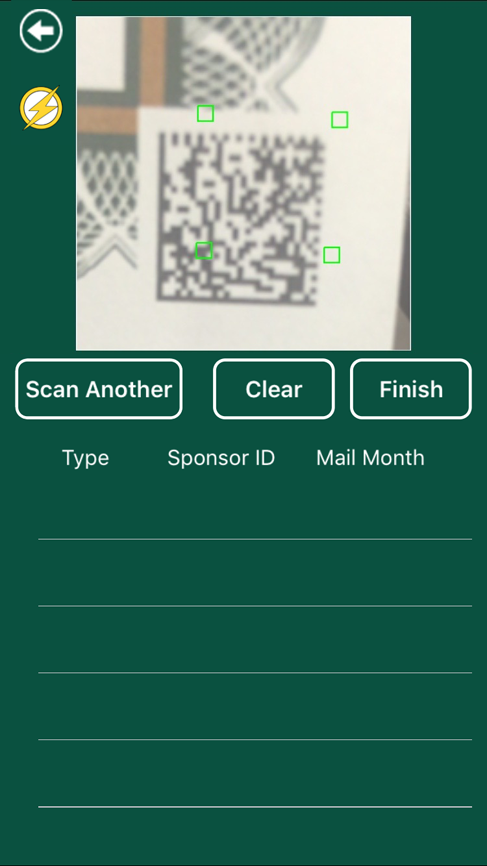
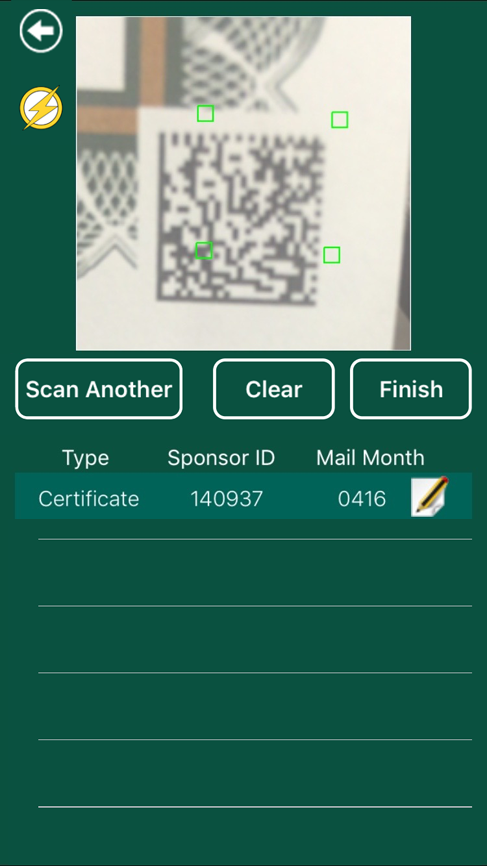
1. Center the barcode in the scanning window.
Note: you can click on the camera flash icon to turn on or off the camera light. This is useful to improve scanning performance.

1. First click on the "My Account Information Button" as shown below:
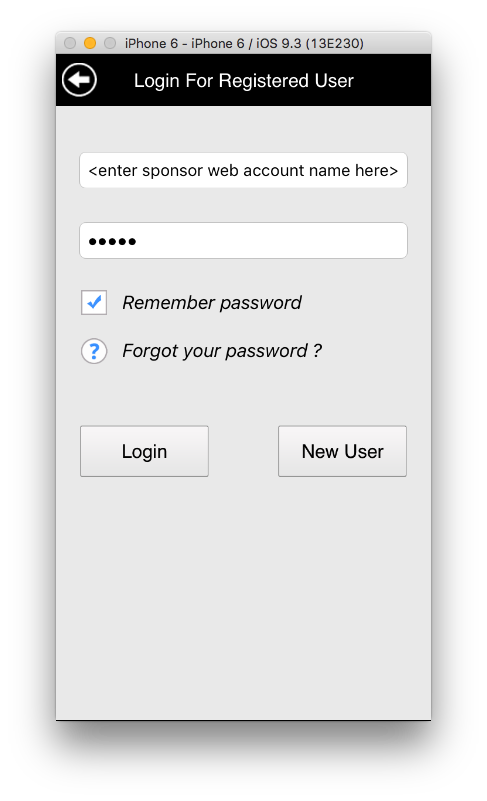
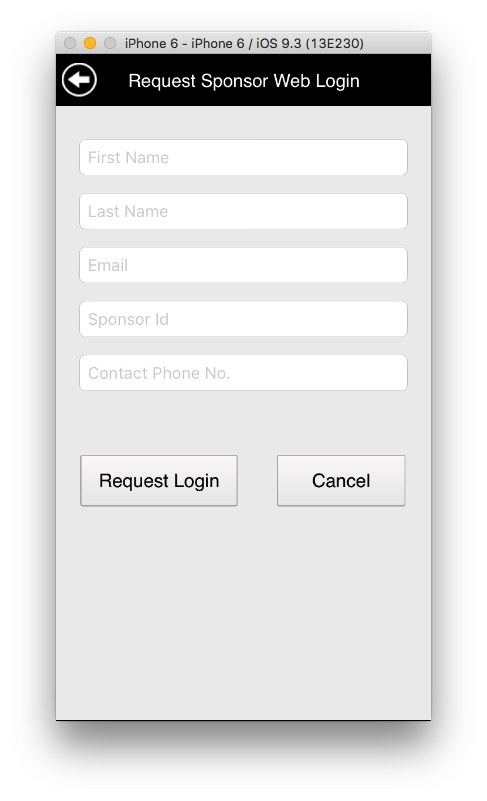
Enter all information above. Your Sponsor Id is located on the lower left corner of your invoice and is a 6 digit account number next to "Account". Click on the Request Login button to send a request to your Our Town Representative. Your Our Town Representative will then create a Sponsor Web user account for you. Once approved and the account is created, you will receive an email containing your Sponsor Web User information. Login with your new user information so you can start to use the mobile application feature.
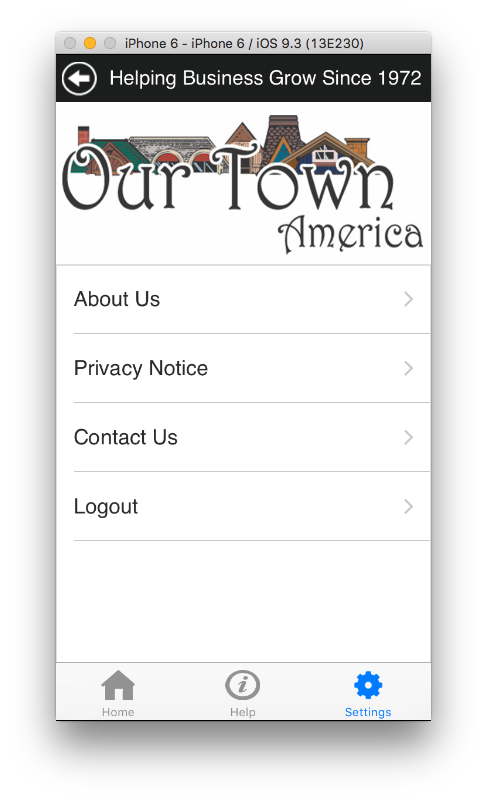
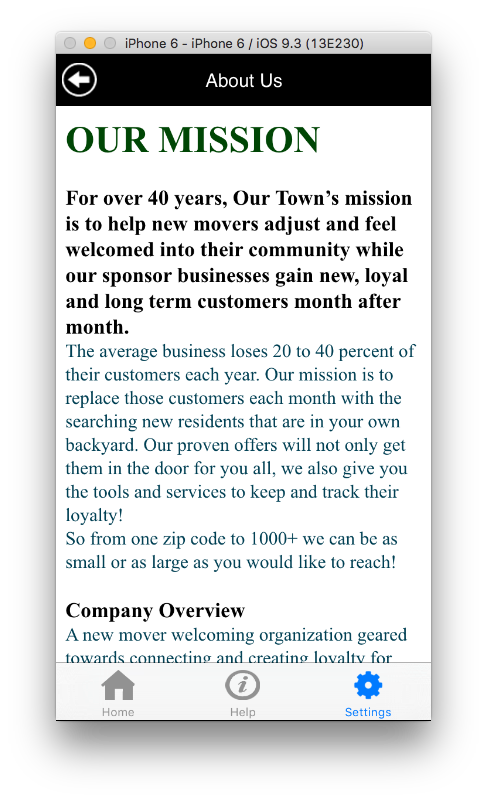
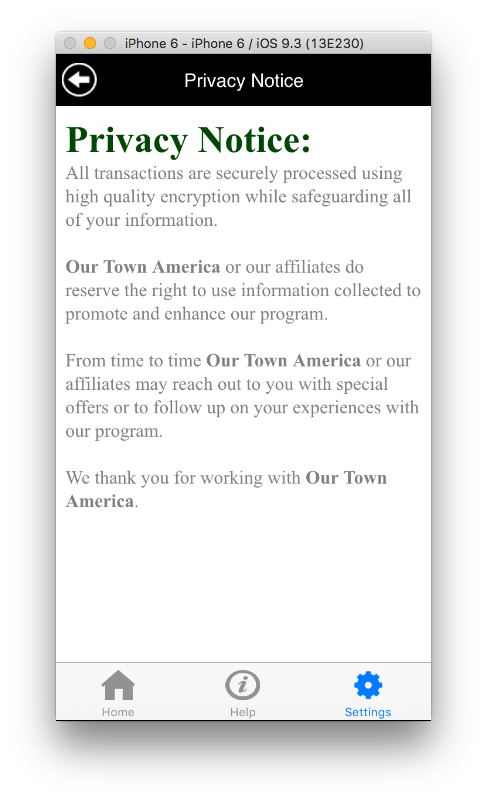
Setting area is broken into four parts: About us, Privacy Notice, Contact Us and Logout.
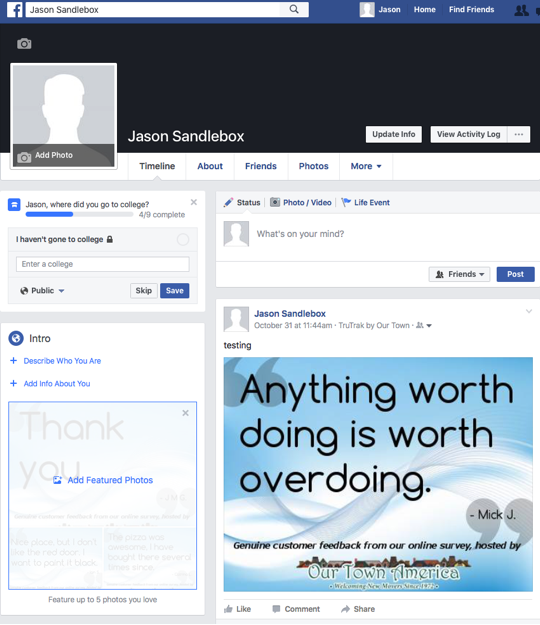
To create a Facebook posting click on the "Post comment to Facebook" button.
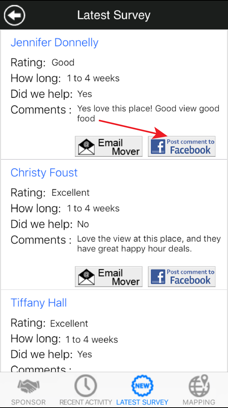
Once you have clicked on the posting button you will be presented with an image of the customers quote along with a text box to add a comment. You can use the comment box to say thanks to your patron.

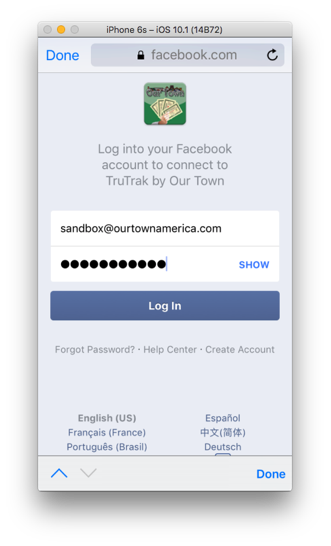
Next, you will have to give TruTrak permission to post to your company timeline. Click on Post comment to Facebook button after you have added your comment. You can post by logging into Facebook with an email and password or you can use the Facebook App to login.

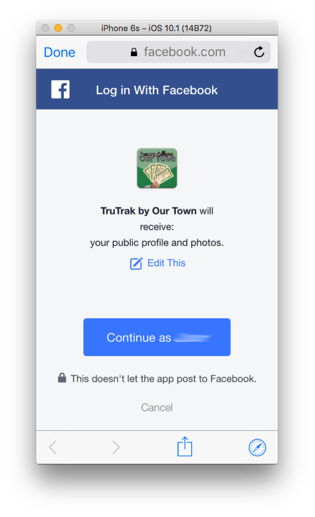
Once you have logged into Facebook the TruTrak app needs permission to post to your timeline. This allows you to post your comments from the TruTrak app to your Facebook page. You will control all the content posted to your timeline.
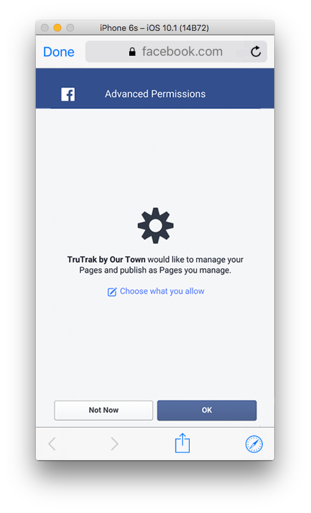
Select OK to be able to post to your timeline.
Once posted the comment will then appear on your timeline! Cool!